


What you will need this week:
I try to do tutorials that don't require Photoshop since it is so expensive, but there is no getting around this one (that I know of). Tip: before I owned photoshop, I used to go to the public library and use their iMacs that had Adobe Create Suite installed, it was totally free to use!

Find some glitter that you like on the internet. For the purpose of this tutorial I want to show you that you can use glitter from ANYTHING. For example, we are going to make Glitter Letters (shown above) out of THIS picture:
 |
| image via |
OR if you are totally dead set on using gold glitter like I often use...
try using one of these images:

Save the image to your desktop then open the image in photoshop and select the Rectangular Marquee Tool


Use the marquee tool to select the area of sparkle that you want to use. Since this is an image of shoes (not a background) the sparkles are concentrated to one place. I just selected that square area of glitter.

--Or--
If using one of the gold glitter backgrounds listed above, select a square portion of the image.


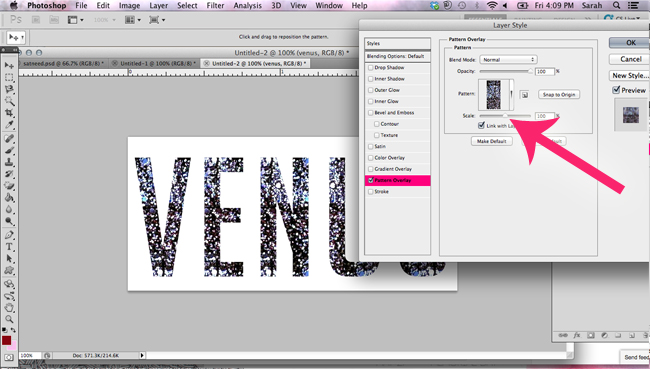
After highlighting you area of glitter you want to use go to Edit ---> Define Pattern --> Then hit OK when prompted to save the new pattern.


Open a new document and use the text box tool to write a word to test your new pattern out. Then double click on that layer to edit layer style, then select "pattern"


Select the drop down arrow in the "pattern" box then find the pattern you just made. It will be the very last one listed. Click that pattern.

You may need to use the "scale" feature. Move the scale percentage to the left to make the sparkle more concentrated, move it to the right to make it less focused. Mine was at the perfect scale to begin with so I didn't need to use the scale feature this time.

Voila! Glitter letters!
As always, if you have ANY ANY ANY questions at all. Doesn't hesitate to ask!
Have a great weekend, y'all!


I have been waiting for this tutorial! and thanks for a clear step-by-step. you're the best!
ReplyDeleteAnd then my little heart broke. No photoshop for this girl.
ReplyDeleteThis is an awesome tutorial though!! If I ever bite the bullet and drop the big bucks, I will be using this right away.
Super cool!
ReplyDeleteHey, new follower from the Aloha Friday blog hop. Awesome tutorial! Love playing around with Photoshop. :)
ReplyDeletexo,
Kristin
aboutagirl.ca
loooooove this!! thank you!! xo
ReplyDeleteBrilliant! I'll add it to my ever-growing list of reasons I need Photoshop :(
ReplyDeleteyou know i love me some glitter. now i just need to buy and learn how to use photoshop!
ReplyDelete-- jackie - jade and oak
-- jewelry giveaway
LOVE these types of posts!! Pinning it & coming back to it when I finally get photoshop! Will photoshop elements be good enough or do I need the fancy stuff?
ReplyDeleteI'm so excited to try this!
ReplyDeleteholy.shit.
ReplyDeletemind.blown.
watch out shitler - i'm labeling everything in the house with these glitter letters.
I wish I could do this in photoshop elements!! :(
ReplyDeleteaweeeeesum!
ReplyDeleteThis is awesome! Done and done. Just tried it in photoshop. Excited to learn something new. Thanks so much! My whole blog will be covered in glitter now. Maybe even my lips in every picture. Watch out ruby red slippers... you're about to be a texture in photoshop!
ReplyDeletethanks for the tutorial!
ReplyDeleteSo I'm obviously a bit behind on reading the tutorial, but before I paid for Photoshop, I used to use GIMP. It's a pretty great free alternative. Not quite as intuitive, though.
ReplyDeleteThis is awesome!!! Is there any way to do it without photoshop?
ReplyDeletexx
Lisa @ The Skinny on Health
http://www.theskinnyonhealth.com
The second glitter link to Pinterest is missing, can you email it to me if you recall which one it was? :)
ReplyDeleteI feel like I've struck pure gold (ha ha- I'm gay, I know) with your blog!! I can't stop reading!!!! You are ahhhh-mazing!
ReplyDeleteI just discovered this on pinterest and am about to glitter. all. the. things. Thanks!
ReplyDeleteIf you are looking for a free way of achieving the same effect (ie without using Photoshop) you can use pixlr.com, by the using the wand tool to delete the background, leaving only your glitter letters. :)
ReplyDeleteTHANKK YOUUU FOR THIS.YOU SAVED MEE!!
ReplyDeleteThis was hands down the most easiest tutorial on making simple filled letters! thank you so very much for this.
ReplyDeleteOMG never knew this was possible let alone so easy! thanks!
ReplyDelete