Tip #1

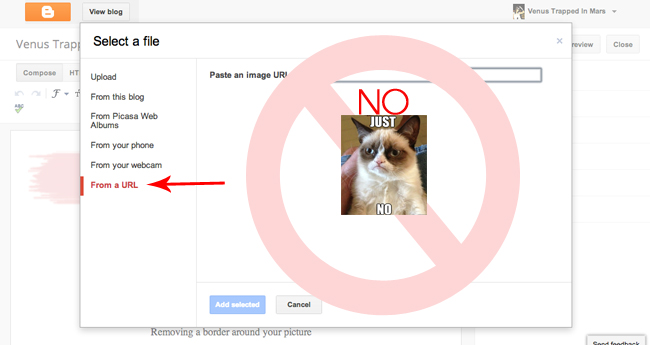
Never upload pictures from a URL. That includes GIFs as well.

Why, you ask? Well, when you upload from a URL, if the site you uploaded the image from is taken down, or if the person's internet (work computer for example) blocks the site you borrowed the image from... your reader will see this:
I wish someone had told me this earlier. This is one of my first blog posts ever. The post just looks ridiculous now!
Voila! Then you have your image (or gif) on your blog for the whole world to see forever and ever!
LOLZzZ!
Tip #2

When you first start a new blog, blogger automatically has a boarder / shadow around EVERY SINGLE PICTURE. So dang ugly and annoying. It will place a shadow boarder around anything it considers an image. Someone not OCD about clean images may not notice this, but it drives me bonkers.
For example:
Let's fix this on your blog, shall we?
Next, you are going to copy and paste this code directly into the add CSS section:
.post-body img, .post-body .tr-caption-container, .Profile img, .Image img,
.BlogList .item-thumbnail img {
padding: none !important;
border: none !important;
background: none !important;
-moz-box-shadow: 0px 0px 0px transparent !important;
-webkit-box-shadow: 0px 0px 0px transparent !important;
box-shadow: 0px 0px 0px transparent !important;
}
.BlogList .item-thumbnail img {
padding: none !important;
border: none !important;
background: none !important;
-moz-box-shadow: 0px 0px 0px transparent !important;
-webkit-box-shadow: 0px 0px 0px transparent !important;
box-shadow: 0px 0px 0px transparent !important;
}
No more shadow boxes! Yay!
TIP #3
Which Looks better?
I hope you said left. If you said right, I'm gong to assume it is just because you love Adam Sandler and hate my outfit on the left. In which case I'm ok with it.
There IS a way to automatically resize all pictures in blogger to the proper width, but I personally don't recommend it, so I'm not going to talk about that today. That is for another day.
Let's talk about manually resizing all pictures in a blog post using Pic Monkey.
Figure out your post width.
I could tell you a million steps to take to go into your Edit HTML, find your #main-wrapper width and if you would like to do that, use this tutorial here.
Otherwise, just guess and check. Mine blog is 650px wide, and I left align all pictures to be sure they fit. Start by sizing your picture to 650px (see below), plug it in as original size (as opposed to x-large or medium) , and see if it is a good width for your blog, then adjust accordingly until you get the correct size.
Upload your new saved image in blogger. Be sure you choose original size as the sizing option.
Repeat this for each image you have. Yes this is a couple extra steps, but it will do wonders for the aesthetic of your blog!


Love this! I just started experimenting with sizing my images and I already like the look so much more! These are great tips, thanks for another great Saturday Session!!
ReplyDeleteOkay , I am confessing the bad habit of taking "image from URL" . But I am trying to take over , I SHOULD have .
ReplyDeleteNoor @ Noor's Place
THANK YOU!! I've been wondering how to get rid of those shadows, already fixed it! Now I gotta figure out how to size my pictures correctly.
ReplyDelete-Sarah
I love your Saturday sessions! I size all my pics bigger, but I haven't been doing matching widths... oh duh! Starting now! :)
ReplyDeleteAlso, do you ever upload to Photobucket and then use the URL in blogger? Like graphics, buttons, etc? That's what I've been doing, so I think the only time I would have a problem is if photobucket is down? Let me know if I'm missing something here! :)
Great explanations! I confess that I am a photo from URL person half of the time, and now I see the error in my ways... :)
ReplyDeleteI never noticed any shadows... I still don't. Is something wrong with my eyes?!
ReplyDeleteThank you for all these tips!
ReplyDeleteThank you! I will fix this going forward! :)
ReplyDeleteGreat tips, THANKS!
ReplyDeleteKatie @ He Calls Me Grace
Ummm I upload every image from a URL. Never knew it would go away if the original went away! And about the shadow boxes-- I never even noticed them. In fact I'm not even sure if I have them! My computer at home displays things differently than 99% of all other computers in the world so I'll have to check at work on Monday.... thanks for this though!!!
ReplyDeleteOk Karren said you were cool so I came on over to see for myself and what do I find.......a very interesting post..........not that I have ever uploaded from a URL but now I know all about doing so..........
ReplyDeleteI think I might come back here because you do sound cool just don't tell Karren she was right she might get a big head..........lol
Looks I will be going through old blog posts and making some changes next time I'm bored :)
ReplyDeleteThis was fabulous!! I came over from Kisses and Croissants and I am so glad that I clicked on this link! It was very helpful :)
ReplyDeletemysmallrayofsunshine.blogspot.com
I've been trying to get rid of borders FOREVER. Thank you thank you thank you.
ReplyDeleteIt was hard to say left because I do love me some Adam Sandler.
ReplyDeletethank you so much for the photo width tip!! It would drive me INSANE to have them all different widths...not clean at all. Have a great Sunday! :)
ReplyDeleteThis is a wonderful post! I have been trying to figure out how to get the little boxes around my photos to go away!
ReplyDeleteEmily
eageremily.blogspot.co
Thanks soooo much for the tips.. I'm bookmarking this post so I can use all the information when our blog officially launches on 8.1.13 -- can't wait!
ReplyDelete-Kate (theflorkens.com)
Thanks for posting! I definitely fixed some things this weekend and while I don't know that I love the huge size of my iPhone pics, it's good motivation to get a better camera!
ReplyDeleteEXCELLENT TUTORIAL!
ReplyDeleteGreat tips; especially for a newbie blogger who loves pictures! Thanks! :)
ReplyDeleteWhyyy couldn't I have had this when I first started! There would have been way less headaches haha! But would you happen to know the trick to making the post text not exceed the width of the photos? I have the problem solved, but it's an html pain in the a** for every line I type!
ReplyDeleteOMG I have been trying to get rid of those stupid shadow boxes forever!! They drive me crazy! Thank you!
ReplyDeleteHere I am in full stalker mode coming back for round 2 on commenting this post haha!
ReplyDeleteMy main wrapper says 200px and that just does not seem right.
I've been trying to adjust my post width for the longest time now (bc I hate how wide the text goes and how far past the header it is) and just can't seem to find where that piece of html is hiding that I need to adjust. Any suggestions?
I LOVE your tutorials. Really the best I've come across. I have been trying to get rid of those picture borders since I started. THANK YOU! Keep teaching!
ReplyDeleteThe weird picture border was one of the first things I got rid of. I wish you had written this post then! I think I emailed a random person who had an awesome design and asked hoe to get rid of it! lol
ReplyDeleteOops I think I'm an offender on the photo tips - studying up and will sin no more! :)
ReplyDeleteGreat post. Its very interesting and enjoyable. Its must be helpful for us. Thanks for sharing your nice post.
ReplyDeleteClipping Path Service
Absolutely very informative post.It is very useful for us.Thanks for contributing your important time to post such an interesting & useful collection.It would be knowledgeable & resources are
ReplyDeletealways of great need to everyone. Please keep continue sharing.
Clipping path service India
The post is so different naturally i enjoy this.
ReplyDeleteraster to vector service
Thanks for sharing it. Actually i had no clear concept about it but now i am clear about it. Also i want to know more from your next blog. Thank you. Clipping Path Service Provider
ReplyDelete"So great to see amazing steps within this blog.
ReplyDeleteThanks for posting and sharing them."
clipping path service
Many days ago i made a blog but i can't upload any image from URL. I'm happy to read your article and i hope i will be able to solve my problem. Thank you for helpful sharing
ReplyDeleteremove background service
Great post. thank you so much for sharing this beautiful article.
ReplyDeleteOffshore Clipping Path |Clipping Creations India
Great tips and tricks. I will try it as your instruction. Thanks for sharing a brilliant tips. clipping path service
ReplyDelete