


Whoa. This is my 14th Saturday Sessions post. WOW! Fun stuff. Let's talk about something that will save your life, and by life I mean time. IMAGE MAPPING! So this week I added a new little social media gadget with all my links to the left. Looks complicated right? Not even a little bit. I used photoshop for mine, but for this tutorial I'm going to use pic monkey.

Step 1: Select an ombre block of color to use. I have made several options for you, just click the color your want to use, download it and save it to your desktop. If you want a color that is not shown, just leave me a note in the comments box, I'll hook you up!


Step 2: Open your ombre image in Picmonkey
Step 3: Resize your image to the correct width. My sidebar width I use on the left side is 300. So that is what I'm going to size mine at.

Step 4: Go to the overlays tab, and begin adding simple rectangular divider lines. Add one to separate each social media outlet you want to use. I'm going to be using Facebook, Twitter, Bloglovin, Pinterest and Instagram. So I'll need 4 white divider lines. Tip: Right click to quickly duplicate each overlay.


Step 5: Add your text! Easy enough, right? Maybe even get wild and crazy and include hearts or something. I'm not wild and crazy, so I'll just add the text. Then save your image as a PNG.

Step 6: Upload to your photobucket account and copy the direct link provided.

Step 7: Time to map your image. Visit this website here. Paste the URL you just copied from photobucket and click start mapping your image.

Step 8: Click rectangle

Pull and drag your rectangle to fill the area you want clickable for that social media icon. Then replace http://www.image-maps.com/ with your link. I obviously replaced mine with my twitter URL. Repeat this step for all 5 (or however many you have) different links.

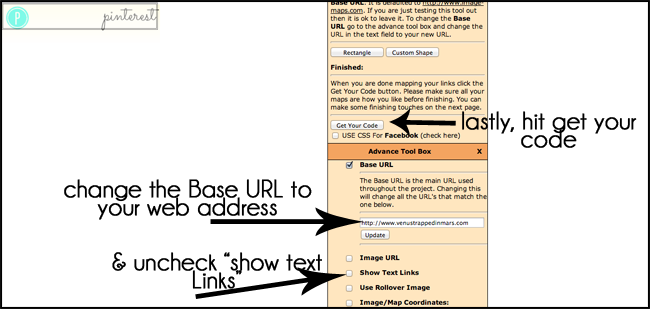
Step 9: Be sure to replace the Base URL with your blog's URL. Then uncheck show text links. Finally hit get your code.
Step 10: Click on the tab labeled HTML CODE then copy that code provided.

Step 11: Almost done, whew! I'm tired. Go to your blogger layout dashboard and select Add New Gadget----> Add HTML. Paste that code you just copied. Hit save. DONE!

You can use image mapping for anything! Navigation bars, social media icons, headers, collages. Anything at all. It is a life saver and so easy to use! Enjoy!
------
I also have a HUUUUUGGGGEEEE giveaway to present to everyone! This month I have teamed up with Marquis from Simply Clarke and 16 other bloggers to giveaway a load of awesome prizes: Ad space on 18 blogs, $100 Target Gift Card, $100 Nordstrom Gift Card and a $50 Starbucks Gift Card.
Before you enter below, make sure to stop by the other co-hosts blogs and tell them thank you!

1. Simply Clarke / 2. Sappy & Happy / 3. My Life In High Heels / 4. Fueled & Aflame / 5. Living In The Moment / 6. Mal Smiles / 7. Never The Same Spice Twice / 8. Katie Did What / 9. Shades of Color Art / 10. Thirty Seven Four / 11. Venus Trapped in Mars / 12. Dancin' With A Dolly / 13. A Girl Smitten / 14. To The Sea / 15. Well Worn Soles / 16. All That Glitters / 17. Through Crystal's Eyes / 18. Harris Heart-to-Hearts


Yes, yes, and yes. Fantastic Saturday Session, as usual! However, I was messing around with the image mapping site a while ago and have a big fat question for you: Is there a way to map a link to an "email me" button? Am I just missing something? I know how to do it with HTML, but that doesn't help me here. Thanks!
ReplyDeleteWow! Very useful information.
Deletehttp://www.elegantweddinginvites.com
TARGET!
ReplyDeleteAnd I had no idea about image mapping - amazing!
I do have fun burning through gift cards :) ... but the ad space is fantastic!
ReplyDeleteThis is wonderful! I can't wait to try this!
ReplyDeleteThe ad space would come in handy for helping to bring my blog more hits, and the gift cards would make for some fun shopping! ;) Thanks!
ReplyDeleteI've been trying to do this for a while, thank you!!
ReplyDeleteI'll take the target or nordstrom gift card please! And this post was very informative :)
ReplyDeleteI would love to win the Target gift card. Targets is only an hour and a half away. Small town living {{{{sigh}}}}
ReplyDeleteNordstrom! Awesome giveaway ;)
ReplyDeleteThis is an AWESOME post, Sarah! Could you make the ombre block for me in turquoise?
ReplyDelete-LesLeigh J.
Also, I think I'd be the most excited about winning the Nordstrom gift card!
ReplyDeleteI am OBSESSED with Nordstrom - but so many good choices! Lovely giveaway :)
ReplyDeleteEkkkkkk the fabulous Nordstrom gift card! I could do some major damage!!! But, heck the Target gift card wouldn't be bad either! :)
ReplyDeleteAmazing! I just trashed the buttons that came with my theme and made new social media icons from your tutorial... and in wordpress! So easy, much appreciated.
ReplyDeleteaaaawesome giveaway - i' m most excited about the target one. woohoo! and an amazing tutorial too smarty pants!
ReplyDelete-- jackie @ jade and oak
I would love to win the Nordstrom gift card.
ReplyDeleteThat is an awesome giveaway!
ReplyDeleteThe ombre is such a good idea! I would totally love to win the ad space!
ReplyDeleteI would love to win the Starbucks GC!!!
ReplyDeletead space would be amazing
ReplyDeletegreat tutorial & giveaway!
ReplyDeleteAwesome tutorial; thank you so much! I have to admit, Target's really got a hold on me - I think I'd be most thrilled to win the gift card there!
ReplyDeletexo
Kym
bitty.and.bunny
Ok I have never even heard of image mapping
ReplyDeletePerhaps I shouldn't be trying to figure this out 3 strong margaritas deep. Or maybe this can end up a-mazing. We shall see.
ReplyDeleteAwesome giveaway!
AD Space! I'm a newbie blogger, and I would love to get some attention! My blog is an attention whore. I tell her to calm down, she will be seen eventually by people in the blog world, but she wants some love now.
ReplyDeleteThe Grand Adventures of Me
That's a really nice tutorial!
ReplyDeleteFor me, either the ad space or the Target giftcard. They have nice, allergy-free items. c:
I needed this!! Thanks so much!
ReplyDeleteNordstrom GC because I can't afford anything there! :)
ReplyDeleteThis is so going on my sidebar come Monday!! Do you mind sending me a navy blue ombre block? Love learning new code as well!! Annnnd awesome giveaway! I'm coveting a new watch at Nordies!!
ReplyDeleteAd space would be HUGE since I'm a new blogger and trying to learn everything about leading a successful blog, haha! :)
ReplyDeleteThank you so much for this tutorial! It worked great in Wordpress too! Your instructions were so easy to follow :)
ReplyDeleteI would love to win the Target gift card!
ReplyDeleteTarget giftcard :)
ReplyDeleteI'm excited to win..uhh...all of it? Is that an appropriate answer? :p
ReplyDeleteAre you kidding? This giveaway is AMAZING. The ad space, the gift cards, can't choose a fav! Maybe the Nordstrom? But they're all amazing!
ReplyDeletehttp://asequinloveaffair.com
I would love to win the Nordstrom giftcard!
ReplyDeleteAnd very cool that you gave these tips! I wish there was a purple ombre.
-AJ
FitTravelerAJ.com
Love the tutorial, gotta find some good dreamweaver tutorials now too
ReplyDelete:)Your tutorials are always awesome and have really good step by step details.
Great giveaway!!!
Lady I am excited to win all of it! Ad space for the responsible past of me and everything else for the impulsive side of me!
ReplyDeleteI am most excited about the nordstrom card! I'm due for a handbag. It's been two years and they have some nice ones! :)
ReplyDeleteI've heard of image mapping but have always been scared to try it. I will definitely have to check this one! Thanks!
ReplyDeleteJamie
greyskysaturday.wordpress.com
Ad space for sure! Awesome giveaway!!
ReplyDeleteA
www.denimanddaydreamsblog.com
Great tutorial. I would totally love to win the Nordstrom gift card!!!
ReplyDeleteYES YES YES!!!! EXCELLENT TUTORIAL! and ps this giveaway is pretty awesome :)
ReplyDeleteoh p.s. could you email me and let me know how you did the ombre? if not - was wondering if you could do it with color D9FFE5
ReplyDeleteThank you so much for this! I've been wondering how to do this. I'll have to try to make one this week. Thanks so so much :)
ReplyDeleteBig Apple, Little Bites
What is the link I'm supposed to put my email in there? I tried just linking it directly to my email address, and that did not work. Thanks!!
ReplyDeleteTarget Target Target!!
ReplyDeletehello nordys cash. i need you in my life.
ReplyDeleteThe ad space!!:)
ReplyDeleteTifani Sipes
http://breakfastattifanis.blogspot.com/
Genius! Thanks for posting this how to. I think I might actually be able to figure it out :)
ReplyDeleteAnd for me what I'm most excited about is a toss up between the ad space and Nordstroms!
I am going to do the tutorial and giveaway. Thank you!
ReplyDeleteI am most excited about the Target giveaway!
ReplyDeleteNordstrom because we don't have one nearby!
ReplyDeleteHi Venus, could you make the ombre image in either mint or light pink?
ReplyDeleteThanks,
The Fashionista Says
thefashionistasays.blogspot.com
I'm really excited about the $100 Target Gift Card! I could spend about 10 of them in one trip if I wanted there. haha. Thanks for the giveaway!
ReplyDeleteWow this is very helpful. Will definitely try it out soon. Thanks!
ReplyDeleteGreat post. I will prbly try this. And I hope I win!
ReplyDeleteoh and i'd like the ad space.
DeleteThe opportunity to have my ad spread out over 18 blogs is unbelievable! Oh, and I need new clothes (Hello, Fall!) so the Nordstrom would be most appreciated!
ReplyDeleteI finally got around to making a gadget links and your instructions were great. Thanks so much for this tutorial! :) You're awesome!
ReplyDeleteThis comment has been removed by the author.
ReplyDeleteSarah, you are a lifesaver!!! Just used this tutorial to create a custom footer to organize my blog labels better and it worked perfect! Thank you thank you thank you!!!
ReplyDeleteThis was super helpful, thanks so much!
ReplyDeleteSeriously, crazy amazing tutorials. Thank you!
ReplyDeleteThank you! These tutorials are so easy to use and much appreciated. Just made my own social media gadget...can't wait to try the others!
ReplyDeleteThank you so much for posting this tutorial!! You just make my life 1000 times easier!!!! :)
ReplyDeleteXO, Briana
http://sequingownsandmermaidcrowns.blogspot.com
OMG!! You have made my life with these posts!! Thank you so much for sharing! Your blog is amazing and I'm currently addicted. :)
ReplyDeleteApparently image-map.com changed its website. Might I suggest an updated post (if you get time). I muddled my way through it, hopefully it worked!
ReplyDelete-AJ
Just added Social icons to my blog and loving it! I am brand new to this so I found it VERY helpful!! I appreciate any other advice, tips, tricks on getting started! :)
ReplyDeleteThank you for all of your helpful Saturday Sessions Tutorials!
ReplyDeletewww.thepreppyballerina.blogspot.com
I'm a little late to the party, but thanks for the post - I will use this so much (and already did!)
ReplyDeletefarmgirlbigcityblog.com
Hey! So I'm making a new "about me" so I was mapping a new image - but when I paste the html into my widget area, the links don't work! It just looks like an image with no links :( Do you know what could be going wrong here?
ReplyDeleteThanks so much for these tutorials btw!
When I go to the image mapping website, there is no image map tool box. I have to right click and select create rectangle and when I do that, I can't drag and drop to re-size the rectangle.
ReplyDeleteI found another one that worked. -> http://www.isdntek.com/tagbot/imap.htm
DeleteThank you! It seems to work fine on the site but when I put it in the text widget it still doesn't work when it's actually on the blog. I'm so confused :/
DeleteI've been wondering how to do this actually. I thought that you had to make individual buttons and post them onto the blog with all separate links. This is so much easier! Thanks so much!!
ReplyDeletehttp://nessabogs.blogspot.com
Hey Sarah, I'm in the process of changing the colors of my blog theme. I used your red block before but I need a purple one now. Could you make one using the color with the hex value #de44cb if it's not too much trouble? Or maybe you could quickly tell me how you do it. Did you use the premium ombre effect on picmonkey?
ReplyDelete